ArtiGrid Documentation
This page introduces the main ArtiGrid features with practical examples. Each section explains what the method does, when to use it, and how to apply it in a real project.
Get Started
ArtiGrid can be configured quickly using a simple configuration file. In this version,
baseUrl is no longer required because the library now detects paths automatically.
Example configuration
<?php
return [
    'db' => [
        'driver' => 'mysql',
        'host' => 'localhost',
        'port' => 3306,
        'dbname' => 'artigrid',
        'user' => 'root',
        'password' => '',
        'charset' => 'utf8'
    ],
    'forms' => [
        'required_all_fields' => true // form field required option
    ],
    'filter' => true,
    'search' => true,
    'add' => true,
    'refresh' => true,
    'actionsPosition' => 'right',
    'edit' => true,
    'view' => true,
    'checkbox' => true,
    'dropdownpage' => true,
    'pagination' => true,
    'delete' => true,
    'delete_multiple' => true,
    'mail' => [
        'host' => 'smtp.gmail.com',
        'username' => 'daniel.telematico@gmail.com',
        'password' => 'your-password',
        'port' => 587,
        'secure' => 'tls',
        'from' => 'daniel.telematico@gmail.com',
        'from_name' => 'ArtiGrid'
    ]
];
?>
Core
The core of ArtiGrid is based on defining a data source and rendering it using different modes. By default, it generates a full CRUD interface, but you can also render specific forms depending on your needs.
render() to display it.
Basic Example
include 'D:\dev\laragon\www\artigrid\ArtiGrid.php';

$grid = new ArtiGrid();
$grid->table('users');

echo $grid->render();
Example result
Render Modes
ArtiGrid supports multiple rendering modes that allow you to display only specific parts of the CRUD system.
echo $grid->render();           // Full CRUD
echo $grid->render("insert");   // Insert form only
echo $grid->render("edit", 1);  // Edit record with ID 1
echo $grid->render("view", 2);  // View record with ID 2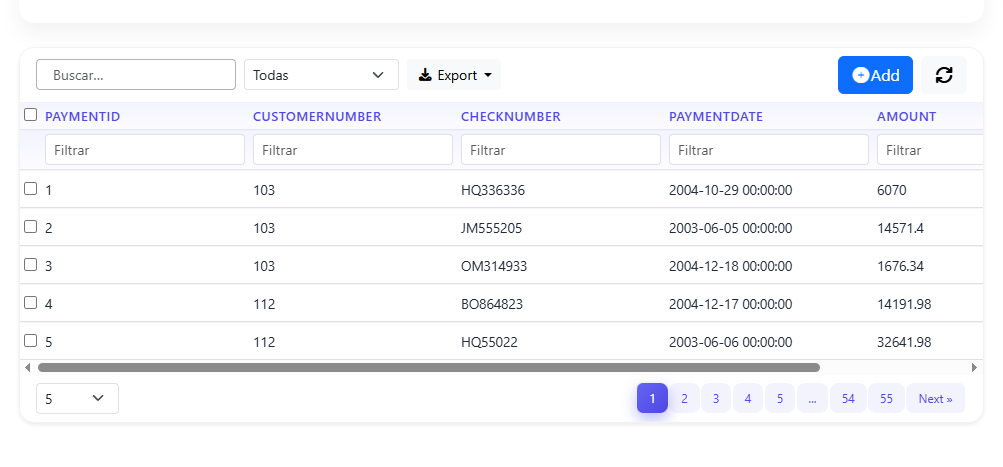
echo $grid->render("select"); // Custom select / login formInsert Form Mode
ArtiGrid allows you to generate a standalone insert form using
render('insert').
This mode displays only the form for creating new records, without showing the grid. It is ideal when you want a dedicated page for data entry.
- Create separate pages for forms
- Build custom workflows
- Hide the grid and focus on input
Example
$grid = new ArtiGrid();

$grid->table('payments')
    ->template('bootstrap5')
    ->required(false)
    ->validation_required('customerNumber')
    ->validation_required('checkNumber');

echo $grid->render('insert');formFields() to control exactly
which fields are displayed in the form.
Fields
ArtiGrid lets you organize and customize fields so your forms become easier to read and more user-friendly. You can group fields, change field types, and even rename column labels without modifying your database.
Arrange Fields
$grid->fields_arrange('name,date,office', 'Group 1 - Names', true, false);Field Types (Select, Input, etc.)
$grid->setFieldType('status', 'select');
$grid->setSelect('status', ['Active', 'Inactive']);Column Rename
The colRename() method allows you to change how column headers
are displayed in the grid without modifying the database structure.
This is useful when your database uses technical names but you want more user-friendly labels in the interface.
$grid = new ArtiGrid();

$grid->table('products')
    ->template('bootstrap5')
    ->colRename('productName', 'Product Name') // rename column
    ->modal();

echo $grid->render();Relational Combobox
The combobox() method allows you to transform a field into a dropdown
(select) using either dynamic or static data sources.
It supports two types of sources:
- Database table: load options from another table by defining the value and label columns.
- Array: define a fixed list of options directly in your code.
In this example, the officeCode field is linked to the
offices table, using officeCode as the value and
city as the label. The lastName field uses a static array
as a simple dropdown source.
Example
$grid = new ArtiGrid();
$grid->table('employees')
    ->template('bootstrap5')
    ->unset('filter', false)
    ->modal();

$grid->combobox('lastName', [
    'Activate' => 'Activate',
    'Desactive' => 'Desactive'
]);

$grid->combobox('officeCode', 'offices', 'officeCode', 'city');

echo $grid->render();
Inline Edit
Inline editing allows users to modify table data directly without opening a separate form or modal window. This is especially helpful for fast edits and repeated updates.
ArtiGrid supports inline editing with different field types such as text, textarea, date, and select.
In the example below, lastName is edited as a textarea and
officeCode is handled as a dropdown list.
Example
$grid = new ArtiGrid();
$grid->table('employees')
    ->template('bootstrap5')
    ->unset('filter', false)
    ->setFieldType('lastName', 'textarea')
    ->setFieldType('officeCode', 'select')
    ->setSelect('officeCode', [
        "2" => 'Boston',
        "7" => 'London',
        "3" => 'NYC',
        "4" => 'Paris',
        "1" => 'San Francisco',
        "6" => 'Sydney',
        "5" => 'Tokyo'
    ])
    ->inlineEdit()
    ->combobox('officeCode', 'offices', 'officeCode', 'city')
    ->perPage(10)
    ->modal();

echo $grid->render();Field Conditions
The fieldCondition() method allows you to create dynamic show/hide
rules for form fields without writing any JavaScript. Rules are defined in PHP
and automatically injected into the frontend via data-field-conditions.
When a condition is defined such as:
$grid->fieldCondition('email', 'officeCode', '==', 4, 'hide'),
ArtiGrid stores an internal rule indicating that the email field
depends on the value of officeCode. When the form is rendered,
these rules are converted into JSON and injected into the frontend. JavaScript
reads them, identifies the trigger field, and evaluates the rule in real time.
- ArtiGrid stores the rule internally and serializes it as JSON on the form element
- On load, JavaScript reads the conditions and evaluates them immediately
- Every time the user changes the trigger field, the rule is re-evaluated
- In edit mode, the condition is applied at form open time based on existing data — no user interaction required
Signature
$grid->fieldCondition(
    string $field,      // Field to show or hide
    string $dependsOn,  // Field that triggers the rule
    string $operator,   // ==, !=, >, <, >=, <=, in, not_in
    mixed  $value,      // Value or array to compare against
    string $action      // 'show' (default) or 'hide'
);
Example — Hide email when officeCode equals 4
$grid = new ArtiGrid();
$grid->table('employees')
    ->template('bootstrap5')
    ->fieldCondition('email', 'officeCode', '==', 4, 'hide');

echo $grid->render();officeCode = 4 in the form, the
email field is hidden automatically. When any other value
is selected, the field becomes visible again.
Supported operators
==→ equals!=→ not equals>/<→ greater / less than>=/<=→ greater or equal / less or equalin→ value is in arraynot_in→ value is not in array
Multiple conditions — chaining
$grid->fieldCondition('email',     'officeCode', '==', 4,                   'hide')
     ->fieldCondition('rut_tutor',  'tipo',       '==', 'menor',             'show')
->fieldCondition('descuento', 'convenio', 'in', ['isapre','fonasa'], 'show');fieldCondition() returns $this, so you can chain
as many rules as needed in a single fluent expression.
Insert mode vs Edit mode
In insert mode, the condition evaluates as soon as the form renders and again on every change to the trigger field. In edit mode, ArtiGrid reads the saved record value and applies the rule immediately when the form opens — no user interaction needed.
- Show/hide fields based on a dropdown selection
- Conditional sections in multi-step forms
- Role-based field visibility without extra JavaScript
- Dynamic form layouts that adapt to user input in real time
Send Email
ArtiGrid allows you to send emails automatically or manually using built-in methods. This is useful for notifications, confirmations, and alerts when data is inserted into the system.
- Automatic → when inserting data (CRUD event)
- Manual → using
sendMail()
1. Automatic Email on Insert
You can automatically send an email when a new record is inserted using
sendEmailInsert().
$grid = new ArtiGrid();

$grid->table('payments')
    ->formFields([
        'customerNumber',
        'checkNumber',
        'paymentDate',
        'amount'
    ])

    ->sendEmailInsert(true, [
        'to' => ['daniel.telematico@gmail.com'],
        'subject' => 'New order',
        'body' => "
            New order
            ID: {id}
            Client: {customerNumber}
            State: {checkNumber}
        "
    ]);

echo $grid->render();- The email is triggered automatically after inserting a record
- You can define recipients, subject, and message body
- Dynamic placeholders like
{id}are replaced at runtime
Dynamic placeholders
You can include any field from your table using curly braces:
{id}{customerNumber}{checkNumber}{any_field}
Client: {customerNumber} → replaced with real value
2. Manual Email Sending
You can also send emails manually at any point using
sendMail().
$grid->sendMail(
    'cliente@email.com',
    'Purchase made',
    'Thank you for your purchase. I have attached your product.'
);3. Mail Configuration
Email functionality depends on your SMTP configuration in the config file.
'mail' => [
    'host' => 'smtp.gmail.com',
    'username' => 'your@email.com',
    'password' => 'your-password',
    'port' => 587,
    'secure' => 'tls',
    'from' => 'your@email.com',
    'from_name' => 'ArtiGrid'
]Use cases
- Order confirmation emails
- Admin notifications
- User alerts
- System logs or events
CallbacksCustom ButtonsAuthentication
UI
You can improve readability by highlighting cells and rows based on field values. This is useful for alerts, statuses, or priority indicators.
Conditional Colors for Cells and Rows
ArtiGrid applies conditional styling to individual cells or entire rows using dynamic rules based on field values — no extra JavaScript needed.
1. Apply Color to a Specific Cell — CellColor()
Highlights a single cell when a condition is met. The fourth argument is a CSS style string applied directly to that cell.
$grid->CellColor('officeCode', '==', 4, 'background:red;color:white');officeCode equals 4, the cell background
becomes red and the text becomes white.
2. Apply Style to an Entire Row — RowColor()
Styles the full row when a condition is met. The fourth argument can be a CSS string or a structured array with multiple properties.
$grid->RowColor('paymentDate', '==', '2004-11-14', [
    'background'  => '#8DED79',
    'color'       => '#000',
    'font-weight' => 'bold'
]);!important overrides.
3. Full Example
$grid = new ArtiGrid();

$grid->CellColor('checkNumber', '==', 'NG94694',    'background:green;color:white;');
$grid->CellColor('paymentDate', '==', '2004-03-10', 'background:red;color:white;');

$grid->RowColor('paymentDate', '==', '2004-11-14', [
    'background'  => '#8DED79',
    'color'       => '#000',
    'font-weight' => 'bold'
]);

$grid->table('payments');
echo $grid->render();CellColor()→ styles individual cells using a CSS stringRowColor()→ styles full rows using a CSS string or an array of properties- Both methods support operators:
==,!=,>,<,>=,<= - Rules are evaluated dynamically on the frontend after each data load
Example
$grid = new ArtiGrid();

$grid->table('payments')
    ->template('bootstrap5')
    ->buttonsArrange();

echo $grid->render();Everything Deactivated
The unset() method allows you to disable specific features of the grid. In this example, all main functionalities are turned off. This effectively deactivates filters, search, add button, refresh, pagination, checkboxes, and action buttons, leaving a minimal table display.
    $grid = new ArtiGrid();
    $grid->table('employees')
        ->template('bootstrap5')
        ->perPage(10)
        ->unset('filter', false)
        ->unset('add', false)
        ->unset('search', false)
        ->unset('refresh', false)
        ->unset('pagination', false)
        ->unset('dropdownpage', false)
        ->unset('checkbox', false)
        ->unset('actions', false);
    echo $grid->render();
Validation
Validation helps you control the information users submit. You can require specific fields, disable the “all required” behavior, and define which inputs must be completed before submitting the form.
Basic Required Validation
$grid = new ArtiGrid();
$grid->table('employees')
    ->template('bootstrap5')
    ->unset('filter', false)
    ->required(false)
    ->validation_required([
        'lastName',
        'firstName',
        'extension'
    ])
    ->modal();

echo $grid->render();Check for Duplicate Records When Inserting
ArtiGrid also allows you to prevent duplicate records when inserting data. This is useful when certain combinations of fields should be unique.
In the following example, the insert will be blocked if another record already exists
with the same title and description.
$grid = new ArtiGrid();

$grid->table('gallery')
    ->required(false)
    ->validation_required('image')
    ->validation_required('title')
    ->validation_required('description')
    ->template('bootstrap5')
    ->fieldType('image', 'image')
    ->formFields([
        'image',
        'title',
        'description'
    ])
    ->checkDuplicateRecord([
        'title',
        'description'
    ]);

echo $grid->render();Query
ArtiGrid allows you to control how data is retrieved and displayed using filters, sorting, grouping, and custom SQL queries.
Basic Query (Custom SQL)
$grid = new ArtiGrid();
$grid->query('SELECT * FROM products WHERE productCode = "S32_2206"')
    ->template('bootstrap5')
    ->modal();

echo $grid->render();CRUD with Query
ArtiGrid also allows you to build a full CRUD interface using custom SQL queries
through the query() method.
This provides full control over the data source, allowing you to filter, join, or transform data directly at the query level instead of relying on a fixed table.
It is especially useful for advanced scenarios where you need specific datasets or more complex data structures.
When using custom queries, ArtiGrid cannot automatically determine which table
should be used for write operations (insert, update, delete). For this reason,
you must explicitly define it using the editable() method.
The editable() method receives the table name, enabling ArtiGrid
to handle all CRUD operations such as add, view, edit,
and delete, even when the data is loaded from a custom query.
$grid = new ArtiGrid();
$table = 'products';

$grid->query("SELECT * FROM $table WHERE productCode = 'S32_2206'")
    ->editable($table)
    ->template('bootstrap5')
    ->formFields([
        'productCode',
        'productName'
    ])
    ->crudCol([
        'id',
        'productCode',
        'productName'
    ])
    ->required(false)
    ->validation_required('productCode')
    ->modal();

echo $grid->render();editable() matches the primary table you intend to update.
Filters & Sorting
You can filter and sort data using built-in methods without modifying your database queries directly.
// Filtering
$grid->where('status','=','active');
$grid->whereLike('name','john');

// Sorting
$grid->orderby('id','desc');where()→ exact filteringwhereLike()→ partial searchorderby()→ sort results
Order By Example
The orderby() method allows you to define how data is sorted
by default when the grid loads.
You can choose ascending (asc) or descending (desc)
order for any column.
$grid = new ArtiGrid();

$grid->table('payments')
    ->template('bootstrap5')
    ->orderby('paymentId', 'desc')
    ->formFields(['customerNumber','checkNumber','amount'])
    ->modal();

echo $grid->render();desc for latest records first (common in dashboards)
and asc for alphabetical or chronological order.
Group By
The groupby() method allows you to group records based on one
or more fields.
This is useful when working with repeated values like customers, categories, or related records, making the data easier to understand.
$grid = new ArtiGrid();

$grid->table('payments')
    ->template('bootstrap5')
    ->groupby(['customerNumber'])
    ->formFields(['customerNumber','checkNumber','amount'])
    ->modal();

echo $grid->render();$grid->groupby(['customerNumber','checkNumber']);
Charts
ArtiGrid includes built-in chart support, allowing you to visualize data directly from the database without requiring extra libraries in your code.
With the chart_labels() method, you can define labels,
multiple datasets, and even execute SQL queries dynamically by prefixing
the query with #.
By combining chart_labels() with chart_view(true),
you can render visual charts together with your grid, giving users both
tabular and graphical views of the same information.
- Direct chart rendering from your grid configuration
- Support for multiple datasets
- Dynamic SQL-based datasets using
#query - Custom chart options such as scales, legends, and plugins
Example
$chart = new ArtiGrid();

$chart->table('orderdetails')
    ->template('bootstrap5');

$chart->chart_labels(
    ['S24_2841', 'S24_3420', 'S24_3949', 'S24_4278', 'S32_4289', 'S50_1341'],
    [
        [
            'label' => '# of Quantity Ordered',
            'data' => '#select quantityOrdered from orderdetails where id IN (60,61,62,63,64,65)',
            'backgroundColor' => 'rgba(255, 99, 132, 0.2)',
            'borderColor' => 'rgba(255, 99, 132, 1)',
            'borderWidth' => 1
        ],
        [
            'label' => '# Price of Order',
            'data' => '#select priceEach from orderdetails where id IN (60,61,62,63,64,65)',
            'backgroundColor' => 'rgba(30, 23, 132, 0.2)',
            'borderColor' => 'rgba(30, 23, 132, 0.2)',
            'borderWidth' => 1
        ]
    ],
    'pie',
    [
        'scales' => [
            'y' => ['beginAtZero' => true]
        ],
        'plugins' => [
            'legend' => ['display' => true]
        ]
    ]
);

$chart->chart_view(true);

echo $chart->render();- The labels define the visible chart categories
- Each dataset can be static or loaded dynamically using SQL
- The chart type in this example is
pie - Options allow you to configure scales, legends, and other chart settings
Supported Chart Types
ArtiGrid supports several common chart types, which can be selected through
the third parameter of chart_labels().
- bar — useful for comparing values across categories
- line — useful for trends over time or sequences
- pie — useful for proportions and percentage-like distributions
- doughnut — similar to pie, but with a centered empty space
- radar — useful for comparing multiple variables around a central axis
- polarArea — useful for comparing values by radial area
Examples of Chart Type Usage
// Bar chart
$grid->chart_labels($labels, $datasets, 'bar');

// Line chart
$grid->chart_labels($labels, $datasets, 'line');

// Pie chart
$grid->chart_labels($labels, $datasets, 'pie');

// Doughnut chart
$grid->chart_labels($labels, $datasets, 'doughnut');

// Radar chart
$grid->chart_labels($labels, $datasets, 'radar');

// Polar area chart
$grid->chart_labels($labels, $datasets, 'polarArea');Dynamic SQL Datasets
One of the most powerful features is the ability to load chart data directly
from SQL queries by prefixing the query string with #.
'data' => '#select quantityOrdered from orderdetails where id IN (60,61,62,63,64,65)'This makes it possible to build real-time visual reports directly from your database without manually preparing arrays.
- Sales dashboards
- Order summaries
- Inventory reports
- Product performance charts
- Admin panels with analytics
JSON API
ArtiGrid can build CRUD interfaces directly from JSON data, which makes it useful when working with APIs or external data sources instead of a direct database table.
Example
            $ch = curl_init();
            curl_setopt($ch, CURLOPT_URL, "https://jsonplaceholder.typicode.com/todos");
            curl_setopt($ch, CURLOPT_RETURNTRANSFER, true);
            $response = curl_exec($ch);
            curl_close($ch);

            // 2. Convert to array
            $data = json_decode($response, true);

            // 3. Take only the first 20 records
            $data = array_slice($data, 0, 20);

            // 4. Create rows for the grid with the fields you need
            $rows = [];
            foreach ($data as $item) {
                $id = $item['id'];
                $rows[] = [
                    'id' => $id,
                    'name' => "Usuario $id",
                    'email' => "usuario$id@mail.com",
                    'created_at' => date('Y-m-d', strtotime("-$id days")),
                    'title' => $item['title'],
                    'completed' => $item['completed'] ? 'Sí' : 'No'
                ];
            }

            // 5. Define grid columns
            $columns = [
                ['name'=>'id','label'=>'ID','type'=>'number'],
                ['name'=>'name','label'=>'Nombre','type'=>'text'],
                ['name'=>'email','label'=>'Correo','type'=>'text'],
                ['name'=>'created_at','label'=>'Fecha','type'=>'date'],
                ['name'=>'title','label'=>'Título','type'=>'text'],
                ['name'=>'completed','label'=>'Completado','type'=>'text'],
            ];

            // 6. Create and configure the grid
            $grid = new ArtiGrid();
            $grid->perPage(10);
            $grid->addCustomBtn(
                'btn btn-sm btn-info', // class
                'ver',                 // action JS
                '', // icon
                []                     // conditions
            );

            // 7. Prepare JSON for the grid
            $jsonData = [
                'columns' => $columns,
                'rows' => $rows
            ];

            // 8. Render the grid
            echo $grid->crudJson($jsonData)->render();
Advanced
Advanced features let you build more dynamic and flexible CRUD interfaces. One common example is joining related tables.
Example
            $grid = new ArtiGrid();
            $grid->table('employees');
            $grid->join('officeCode','offices','officeCode');
            echo $grid->render();
Callbacks
ArtiGrid callbacks allow you to hook into the CRUD lifecycle and execute custom logic before or after database operations. They are especially powerful for implementing advanced validation, enforcing business rules, transforming data, or conditionally stopping an operation.
Unlike basic validations, callbacks give you full control over the request flow. You can validate multiple fields at once, apply complex conditions, and return structured errors that are automatically handled and displayed in the frontend.
You define callbacks per table and event (e.g.
beforeInsert,
beforeUpdate), and ArtiGrid automatically executes them at runtime.
Each callback receives the form data and can either:
- Return modified data → continues the process
- Return
success: falsewith errors → stops the operation
Validation with callbacks
Callbacks can act as a centralized validation layer. Inside beforeInsert
and beforeUpdate, you can validate fields, enforce rules, and return
structured error messages.
Errors can be defined at two levels:
- fields → specific field errors (shown inline in inputs)
- global → general errors (shown as alerts/messages)
If a callback returns:
{ success: false, errors: {...} }, the operation is automatically
canceled and all errors are sent to the frontend for display.
Example callback configuration
<?php
// callbacks/name_table.php  // example: productlines.php

return [
    'beforeInsert' => [
        ['callback' => 'insert_paymets', 'file' => 'functions.php'],
    ],

    'beforeUpdate' => [
        ['callback' => 'update_paymets', 'file' => 'functions.php'],
    ],
];
?>
Example callback function (with validation)
<?php
function insert_paymets($data) {

    $errors = [
        'fields' => [],
        'global' => []
    ];

    if (empty($data['customerNumber'])) {
        $errors['fields']['customerNumber'] = 'Customer is required';
    }

    if (!isset($data['amount']) || $data['amount'] === '') {
        $errors['fields']['amount'] = 'Amount is required';
    } elseif (!is_numeric($data['amount'])) {
        $errors['fields']['amount'] = 'Amount must be a number';
    }

    if (!empty($data['paymentDate'])) {
        if ($data['paymentDate'] > date('Y-m-d')) {
            $errors['global'][] = 'Payment date cannot be in the future';
        }
    }

    if (!empty($errors['fields']) || !empty($errors['global'])) {
        return [
            'success' => false,
            'errors' => $errors,
            'data' => $data
        ];
    }

    return $data;
}
?>Always return the
$data when validation passes. This allows ArtiGrid
to continue the process normally. Use structured errors instead of die()
to keep a clean and user-friendly flow.
Available callback events
- beforeInsert → runs before inserting a new record
- afterInsert → runs after inserting a new record
- beforeUpdate → runs before updating an existing record
- beforeDelete → runs before deleting a record
- Advanced validation beyond simple required fields
- Preventing invalid or inconsistent data
- Business rules enforcement
- Data transformation before saving
- Logging or auditing operations
- Blocking operations under certain conditions
Authentication, Login & Permissions
ArtiGrid allows you to build a complete login system using custom forms, callbacks, sessions, and role-based permissions (RBAC).
1. Custom Login Form
You can design your own login interface using templates.
The placeholders {user}, {password} and {action}
are automatically replaced by ArtiGrid.
$html = '
<div class="container d-flex justify-content-center align-items-center">
    <div class="col-md-8 col-lg-4">
        <div class="card shadow-lg border-0">
            <div class="card-body p-4">
                <h4 class="text-center mb-4">
                    Login Example
                </h4>
                <div class="mb-3">
                    <label class="form-label">User *</label>
                    {user}
                </div>
                <div class="mb-3">
                    <label class="form-label">Password *</label>
                    {password}
                </div>
                <div class="d-grid">
                    {action}
                </div>
            </div>
        </div>
    </div>
</div>';
$grid->setSelectFormTemplate($html);
2. Login Configuration
$grid->table('users')
    ->template('bootstrap5')
    ->required(false)
    ->validation_required('user')
    ->validation_required('password')
    ->formFields(['user','password']);

echo $grid->render('select');select mode is used as a login form.
3. Callback Validation
The login is validated using a callback before processing the form.
// callbacks/users.php
return [
    'beforeSelect' => [
        ['callback' => 'login', 'file' => 'functions.php'],
    ]
];
// functions.php
function login($data){
if (session_status() === PHP_SESSION_NONE) {
session_start();
}
$db = DB::connect();
$user = trim($data['user'] ?? '');
$pass = trim($data['password'] ?? '');
if ($user === '' || $pass === '') {
return [
'success' => false,
'message' => 'Empty username or password'
];
}
$q = new Queryfy($db);
$row = $q->table('users')
->where('user', $user)
->limit(1)
->get();
$row = $row[0] ?? null;
if ($row && password_verify($pass, $row['password'])) {
$permissions = getPermissionsByRole($row['rol']);
$_SESSION['artigrid_auth'] = [
'id' => $row['id'],
'rol' => $row['rol'],
'usuario' => $row['user'],
'permissions' => $permissions
];
return [
'success' => true,
'message' => 'Successful login',
'redirect' => 'management.php'
];
}
return [
'success' => false,
'message' => 'Incorrect username or password'
];
}4. Frontend Handling
document.addEventListener('artigrid_select_form_response', function(e){

    const { response } = e.detail;

    if (response.success && response.data?.success) {
        if (response.data?.redirect) {
            window.location.href = response.data.redirect;
        }
    } else {
        const msg = response.data?.message || response.message;

        Swal.fire({
            icon: 'error',
            title: 'Error',
            text: msg
        });
    }

});
5. Access Logged User
$auth = $grid->auth();

echo $auth['usuario'];
echo $auth['rol'];
6. Permissions (RBAC)
You can control what each user can do using permissions.
if (!$grid->can('add')) {
    $grid->unset('add', false);
}

if (!$grid->can('delete')) {
    $grid->unset('delete', false);
}

if ($grid->canAny(['add','edit'])) {
    echo "User has access";
}

if ($grid->isRole('admin')) {
    $grid->unset('refresh', false);
}
7. Role Permissions Example
function getPermissionsByRole($role){
    return [
        'admin'  => ['add','view','edit','delete'],
        'editor' => ['view','edit'],
        'viewer' => ['view']
    ][$role] ?? [];
}- Login system
- Session management
- Role-based access control
- Frontend feedback
Dependent Dropdowns
ArtiGrid allows you to create dependent dropdowns, where one field dynamically changes its options based on the value selected in another field.
This improves data accuracy and user experience by preventing invalid selections and guiding users through a logical flow.
Basic Example (Office → Manager)
When the user selects an office, the manager dropdown
will only show employees from that office.
$grid->combobox(
    'manager',
    'employees',
    'employeeNumber',
    ['firstName','lastName'], // label
    'office',                 // parent field
    'officeCode'              // DB column to match
);- office → field in the form (parent)
- officeCode → column in database
- The child dropdown updates automatically
Full Example (Multiple Dependencies)
$grid = new ArtiGrid();

$grid->table('consultation')
    ->template('bootstrap5')
    ->required(false)
    ->validation_required([
        'office',
        'manager',
        'country',
        'region',
        'city'
    ])

    ->fields_arrange('office,manager,name', 'Group 1 - Names', true, true)
    ->fields_arrange('country,region,city', 'Group 2 - Regions', true, true)

    // Parent dropdown
    ->combobox('office','offices','officeCode','city')

    // Static dropdown
    ->combobox('name', [
        'Pedro' => 'Pedro',
        'Juan' => 'Juan',
        'JHON' => 'JHON',
        'JACKSON' => 'JACKSON'
    ])

    // Dependent dropdown
    ->combobox(
        'manager',
        'employees',
        'employeeNumber',
        ['firstName','lastName'],
        'office',
        'officeCode'
    )

    // Multi-level dependency (Country → Region → City)
    ->combobox('country','meta_location','id','local_name', null, null, [
        'type' => ['=', 'CO']
    ])

    ->combobox('region','meta_location','id','local_name',
        'country',
        'in_location',
        ['type'=> ['=', 'RE']]
    )

    ->combobox('city','meta_location','id','local_name',
        'region',
        'in_location',
        ['type'=> ['=', 'CI']]
    );

echo $grid->render('insert');- Country → Region → City
- Category → Subcategory
- Office → Employee
- Brand → Model
where) to create
even more precise dropdowns.
HTML Templates for Form Fields
ArtiGrid allows you to fully customize the layout of your forms and views using custom HTML templates. This gives you complete control over the design while the library continues to handle all CRUD logic automatically.
- Insert form
- Edit form
- View mode (record details)
1. Insert Form Template
This template is used when creating new records. Placeholders like
{customerNumber} are automatically replaced by ArtiGrid.
$insert = '<div class="order-form">
    <h2>Customer Order Form</h2>

    <div class="form-group">
        <label>Customer Number: *</label>
        {customerNumber}
    </div>

    <div class="form-group">
        <label>Order Date: *</label>
        {orderDate}
    </div>

    <div class="form-actions">
        {action}
    </div>

</div>';

$grid->setInsertFormTemplate($insert);2. Edit Form Template
This template is used when editing existing records. You can change structure or layout without affecting CRUD functionality.
$edit = '<div class="order-form">
    <h2>Edit Order</h2>

    <div class="form-group">
        <label>Customer Number</label>
        {customerNumber}
    </div>

    <div class="form-group">
        <label>Order Date</label>
        {orderDate}
    </div>

    {action}

</div>';

$grid->setEditFormTemplate($edit);3. View Template
This template is used to display record details in a read-only format.
$view = "<div class='table-responsive'>
    <table class='table table-bordered table-sm'>
        <tr>
            <th>Customer</th>
            <td>{customerNumber}</td>
        </tr>
        <tr>
            <th>Date</th>
            <td>{orderDate}</td>
        </tr>
    </table>
</div>";

$grid->setViewFormTemplate($view);{field} are automatically replaced
with real data or form inputs by ArtiGrid.
Full Example
$grid = new ArtiGrid();

$insert = '<div class="order-form">
    <h2>Customer Order Form</h2>

    <div class="form-group">
        <label>Customer Number: *</label>
        {customerNumber}
    </div>

    <div class="form-group">
        <label>Order Date: *</label>
        {orderDate}
    </div>

    <div class="form-group">
        <label>Status:</label>
        {status}
    </div>

    <div class="form-actions">{action}</div>
</div>';

$edit = '<div class="order-form">
    <h2>Edit Order</h2>

    <div class="form-group">
        <label>Order Number</label>
        {orderNumber}
    </div>

    <div class="form-group">
        <label>Order Date</label>
        {orderDate}
    </div>

    {action}
</div>';

$view = "<div class='table-responsive'>
    <table class='table table-bordered table-sm'>
        <tr>
            <th>Customer</th>
            <td>{customerNumber}</td>
        </tr>
        <tr>
            <th>Date</th>
            <td>{orderDate}</td>
        </tr>
    </table>
</div>";

$grid->setInsertFormTemplate($insert);
$grid->setEditFormTemplate($edit);
$grid->setViewFormTemplate($view);

$grid->table('orders')
    ->template('bootstrap5')
    ->perPage(10)
    ->required(false)
    ->validation_required('customerNumber')
    ->validation_required('orderDate')
    ->modal();

echo $grid->render();- You can design forms exactly like your UI needs
- You separate logic from design
- You can create layouts like dashboards or custom panels
- Works perfectly with Bootstrap or any CSS framework
ArtiGrid includes integrated PDF support, allowing you to generate custom documents such as invoices, reports, or printable summaries directly from PHP.
getPDFObject() to access the internal PDF engine,
build dynamic HTML content, and render it as a PDF document.
1. Get PDF Object
This retrieves the PDF object from ArtiGrid so you can generate a document using HTML content.
$pdf = $grid->getPDFObject();2. Prepare Invoice Data
Define the main invoice information and the list of items.
$invoiceData = [
    "client_name" => "John Smith",
    "invoice_number" => "INV20260316",
    "invoice_date" => "2026-03-16",
    "due_date" => "2026-03-30",
    "notes" => "This is a sample invoice generated with ArtiGrid."
];

$items = [
    ["description" => "Product A", "quantity" => 2, "unit_price" => 1500],
    ["description" => "Product B", "quantity" => 1, "unit_price" => 3000],
    ["description" => "Service C", "quantity" => 3, "unit_price" => 1200]
];
3. Generate Table Rows and Calculate Totals
Loop through the items, generate the invoice rows, and calculate the final total.
$totalAmount = 0;
$rowsHtml = "";

foreach ($items as $index => $item) {
    $amount = $item['quantity'] * $item['unit_price'];
    $totalAmount += $amount;

    $rowsHtml .= "<tr>
        <td>" . ($index + 1) . "</td>
        <td>" . $item['description'] . "</td>
        <td>" . $item['quantity'] . "</td>
        <td>" . $item['unit_price'] . "</td>
        <td>" . $amount . "</td>
    </tr>";
}
4. Create Full HTML for the Invoice
Build the HTML layout that will be rendered inside the PDF.
$html = <<<EOD
<h1 style="text-align:center;">Invoice</h1>
<table>...</table>
<table border="1">
    ...
    $rowsHtml
    ...
</table>
<p><strong>Notes:</strong> {$invoiceData['notes']}</p>
EOD;5. Generate and Output the PDF
$pdf->SetFont('dejavusans', '', 12, '', true);
$pdf->AddPage();
$pdf->WriteHTML($html);
$pdf->Output("invoice_demo.pdf", "I");
exit;"I"→ display the PDF in the browser"D"→ force download"F"→ save to file
Full Example
$grid = new ArtiGrid();

// Get PDF object
$pdf = $grid->getPDFObject();

// Sample invoice data
$invoiceData = [
    "client_name" => "John Smith",
    "invoice_number" => "INV20260316",
    "invoice_date" => "2026-03-16",
    "due_date" => "2026-03-30",
    "notes" => "This is a sample invoice generated with ArtiGrid."
];

$items = [
    ["description" => "Product A", "quantity" => 2, "unit_price" => 1500],
    ["description" => "Product B", "quantity" => 1, "unit_price" => 3000],
    ["description" => "Service C", "quantity" => 3, "unit_price" => 1200]
];

// Calculate totals
$totalAmount = 0;
$rowsHtml = "";

foreach ($items as $index => $item) {
    $amount = $item['quantity'] * $item['unit_price'];
    $totalAmount += $amount;

    $rowsHtml .= "<tr style='background-color:#f2f2f2;'>
        <td style='width:5%;text-align:center;'>" . ($index + 1) . "</td>
        <td style='width:50%;'>" . $item['description'] . "</td>
        <td style='width:15%;text-align:center;'>" . $item['quantity'] . "</td>
        <td style='width:15%;text-align:right;'>$ " . number_format($item['unit_price'],0,",",".") . "</td>
        <td style='width:15%;text-align:right;'>$ " . number_format($amount,0,",",".") . "</td>
    </tr>";
}

$totalFormatted = number_format($totalAmount, 0, ".", ",");

// Full HTML invoice
$html = <<<EOD
<h1 style="text-align:center;">Invoice</h1>

<table style="width:100%;font-size:12px;margin-bottom:20px;">
<tr>
    <td style="width:50%;">Client:<br><strong>{$invoiceData['client_name']}</strong></td>
    <td style="width:50%;">Invoice No.:<br><strong>{$invoiceData['invoice_number']}</strong></td>
</tr>
<tr>
    <td>Invoice Date:<br>{$invoiceData['invoice_date']}</td>
    <td>Due Date:<br>{$invoiceData['due_date']}</td>
</tr>
</table>

<table style="width:100%;border-collapse: collapse;font-size:11px;" border="1">
<tr style="background-color:#d9d9d9;">
    <th style="width:5%;">#</th>
    <th style="width:50%;">Description</th>
    <th style="width:15%;">Quantity</th>
    <th style="width:15%;">Unit Price</th>
    <th style="width:15%;">Amount</th>
</tr>
$rowsHtml
<tr style="background-color:#e1e1e1;">
    <td colspan="4" style="text-align:right;"><strong>Total</strong></td>
    <td style="text-align:right;"><strong>$ $totalFormatted</strong></td>
</tr>
</table>

<br>
<p><strong>Notes:</strong><br>{$invoiceData['notes']}</p>
EOD;

// Generate PDF
$pdf->SetFont('dejavusans', '', 12, '', true);
$pdf->AddPage();
$pdf->WriteHTML($html);
$pdf->Output("invoice_demo.pdf", "I");
exit;- Use
getPDFObject()to access PDF features - Generate dynamic HTML for invoices, reports, or summaries
- Write the HTML into the PDF document
- Display it in the browser or save it as a file
Action Buttons Conditions
ArtiGrid allows you to control the visibility of action buttons such as
view, edit, and delete based on
dynamic conditions.
Using the setActionCondition() method, you can define rules
that determine when a button should be shown or hidden for each row.
- Field name
- Operator (==, !=, >, <, etc.)
- Value to compare
Example
$grid = new ArtiGrid();

$grid->table('employees')
    ->template('bootstrap5')
    ->unset('filter', false)

    // Hide delete button for employee 1370
    ->setActionCondition('delete', ['employeeNumber', '!=', 1370])

    // Hide edit button for lastName = Hernandez
    ->setActionCondition('edit', ['lastName', '!=', 'Hernandez'])

    // Hide view button for employee 1501
    ->setActionCondition('view', ['employeeNumber', '!=', 1501])

    ->modal();

echo $grid->render();- Delete is disabled for employee 1370
- Edit is disabled for users named "Hernandez"
- View is disabled for employee 1501
Why use this
- Restrict actions for specific records
- Apply business rules directly in the UI
- Prevent accidental edits or deletions
- Simulate permission systems without backend logic
Actions Position
ArtiGrid allows you to control where the action buttons (view, edit, delete)
are displayed within the table using the actionsPosition() method.
By default, action buttons are displayed on the right side of the grid, but you can easily move them to the left depending on your layout needs.
right→ default position (end of the table)left→ moves actions to the beginning
Example
$grid = new ArtiGrid();

$grid->table('products')
    ->template('bootstrap5')
    ->required(false)
    ->actionsPosition('left') // move actions to the left
    ->validation_required('productCode')
    ->perPage(10)
    ->modal();

echo $grid->render();When to use it
- When you want quick access to actions
- When following UI patterns where actions come first
- When combining with checkboxes or bulk actions
- When using compact or admin-style layouts
actionsPosition() with:
buttonsArrange()→ dropdown actionsaddCustomBtn()→ custom buttonssetActionCondition()→ conditional visibility
HTML Template for CRUD
ArtiGrid allows you to fully customize the layout of your CRUD interface using HTML templates. This gives you complete control over where each element is rendered.
Instead of using a fixed layout, you can reposition components like: search inputs, buttons, pagination, and the table itself.
Available placeholders
{table}→ main data table{search_input}→ search input{search_column}→ column selector{add_button}→ add record button{bulk_delete}→ delete multiple button{pagination}→ pagination controls{perpage}→ records per page selector{refresh}→ refresh button{search}→ legacy combined search
search_input and
search_column, allowing you to place them independently.
Example
$grid = new ArtiGrid();

$grid->setCrudTemplate('
    <div class="d-flex justify-content-between align-items-center mb-2 p-2">
        <div class="d-flex gap-2">
            {bulk_delete}
            {pagination}
        </div>

        <div class="d-flex gap-2">
            {add_button}
            {refresh}
        </div>
    </div>

    <div>{table}</div>

    <div class="d-flex align-items-center mt-2 p-2 w-100">
        <div>
            {perpage}
        </div>

        <div class="ms-auto d-flex gap-2 align-items-center">
            {search_input}
            {search_column}
        </div>
    </div>
');

$grid->table('payments')
    ->template('bootstrap5')
    ->fieldCss('customerNumber', ['customerNumber', 'demo'])
    ->formFields(['customerNumber','checkNumber','paymentDate', 'amount'])
    ->modal();

echo $grid->render();
What this layout does
- Top section → buttons and pagination
- Middle → table
- Bottom → per-page + search controls
- Custom admin dashboards
- Modern UI layouts
- Minimalist interfaces
- Integration with design systems
setCrudTemplate() with:
buttonsArrange()addCustomBtn()setActionCondition()
Overview Nested Table
Each nested grid is fully independent and can have its own actions, pagination, form fields, validation rules, column visibility, and conditional button behavior. ArtiGrid automatically handles all AJAX loading, parent–child filtering, and foreign key synchronization.
- Parent–child relationship filtering
- Dynamic AJAX loading per level
- Independent CRUD operations per level
- Multi-level nested hierarchy rendering
- Pagination and searching inside child grids
- Bulk edit and bulk delete operations
- Automatic foreign key synchronization on insert
Hierarchy Example
This is the structure used in the full example on this page:
Basic Nested Table
The nestedTable() method is the only thing you need to define a child grid.
You provide a label, the parent key, the child table, and the child key.
Signature
$grid->nestedTable(
    string $label,       // Tab/section label shown in the UI
    string $parentKey,   // Column in the parent table (e.g. "orderNumber")
    string $childTable,  // Child table name (e.g. "orderdetails")
    string $childKey,    // Column in the child table that references the parent
    array  $config = []  // Optional configuration (see next section)
);
Minimal Example
$grid = new ArtiGrid();
$grid->table('orders');

$grid->nestedTable("Order Details", "orderNumber", "orderdetails", "orderNumber");

echo $grid->render();orderdetails is loaded automatically,
filtered to show only the records that belong to that order.
Configuration Options
The fourth argument of nestedTable() accepts an array
with options that apply exclusively to the child grid.
Available keys
$grid->nestedTable("Label", "parentKey", "childTable", "childKey", [

    // ── Actions ──────────────────────────────────────────────────
    "actions" => [
        "add"             => true,
        "edit"            => true,
        "delete"          => true,
        "view"            => true,
        "search"          => true,
        "refresh"         => true,
        "delete_multiple" => true,
        "edit_multiple"   => true,
    ],

    // ── Layout ───────────────────────────────────────────────────
    "buttonsArrange" => true,   // group action buttons into a dropdown
    "useModal"       => false,  // open edit/view forms inline (not in a modal)
    "perPage"        => 10,     // rows per page
    "template"       => "bootstrap5",

    // ── Columns & fields ─────────────────────────────────────────
    "columns"    => ['field1', 'field2'],   // visible table columns
    "formFields" => ['field1', 'field2'],   // fields shown in insert/edit form

    // ── Validation ───────────────────────────────────────────────
    "requiredFields"    => ['field1'],
    "allFieldsRequired" => false,

    // ── Conditional action buttons ────────────────────────────────
    "actionConditions" => [
        "edit"   => [["field" => "status", "operator" => "!=", "value" => "closed"]],
        "delete" => [["field" => "active", "operator" => "==", "value" => "1"]],
    ],

    // ── Sub-nesting (level 3+) ────────────────────────────────────
    "nestedGrids" => [
        [
            "label"      => "Sub-label",
            "parentKey"  => "someKey",
            "childTable" => "some_table",
            "childKey"   => "some_fk",
            "config"     => [ /* same options recursively */ ]
        ]
    ]
]);Multi-level Nesting
To nest a grid inside a nested grid (level 3, 4, …), use the
nestedGrids key inside the parent's config array.
This works recursively to any depth.
Example — Level 2 + Level 3
$grid = new ArtiGrid();
$grid->table('orders');

$grid->nestedTable("Order Details", "orderNumber", "orderdetails", "orderNumber", [

    "actions"     => ["add" => true, "edit" => true, "delete" => true, "view" => true],
    "columns"     => ['productCode', 'quantityOrdered', 'priceEach'],
    "formFields"  => ['productCode', 'quantityOrdered', 'priceEach'],
    "perPage"     => 5,

    // ── Level 3 nested inside orderdetails ──────────────────────
    "nestedGrids" => [
        [
            "label"      => "Products",
            "parentKey"  => "productCode",
            "childTable" => "products",
            "childKey"   => "productCode",
            "config"     => [
                "actions"    => ["add" => true, "edit" => true, "delete" => false, "view" => true],
                "columns"    => ['productCode', 'productName', 'productLine', 'quantityInStock'],
                "formFields" => ['productCode', 'productName', 'productLine', 'quantityInStock'],
                "perPage"    => 5,
            ]
        ]
    ]
]);

echo $grid->render();Multiple Independent Children
You can attach more than one independent child grid to the same parent
by calling nestedTable() multiple times. Each child is
completely independent — it has its own actions, columns, and config.
Example — Two children on the same parent
$grid = new ArtiGrid();
$grid->table('orders');

// ── Child 1: orderdetails ─────────────────────────────────────────
$grid->nestedTable("Order Details", "orderNumber", "orderdetails", "orderNumber", [
    "actions"    => ["add" => true, "edit" => true, "delete" => true, "view" => true],
    "columns"    => ['productCode', 'quantityOrdered', 'priceEach'],
    "formFields" => ['productCode', 'quantityOrdered', 'priceEach'],
    "perPage"    => 5,
]);

// ── Child 2: customers (independent, same parent key) ─────────────
$grid->nestedTable("Customers", "orderNumber", "customers", "orderNumber", [
    "actions"    => ["add" => true, "edit" => true, "delete" => false, "view" => true],
    "columns"    => ['customerName', 'city', 'country'],
    "formFields" => ['customerName', 'city', 'country', 'orderNumber'],
    "perPage"    => 5,
]);

echo $grid->render();Action Conditions in Nested Grids
You can control which action buttons (edit, delete, view) appear on
each child row using actionConditions inside the config.
The condition is evaluated against the row's own field values.
Example — Hide Edit for a specific productCode
$grid->nestedTable("Order Details", "orderNumber", "orderdetails", "orderNumber", [

    "actions" => ["add" => true, "edit" => true, "delete" => true, "view" => true],

    // Hide "Edit" when productCode == 'S18_2325'
    "actionConditions" => [
        "edit" => [
            [
                "field"    => "productCode",
                "operator" => "!=",
                "value"    => "S18_2325"
            ]
        ]
    ],

    "columns"    => ['productCode', 'quantityOrdered', 'priceEach'],
    "formFields" => ['productCode', 'quantityOrdered', 'priceEach'],
]);==, !=, >, <,
>=, <=, in, not in
Multiple conditions on different buttons
"actionConditions" => [
    "edit"   => [["field" => "status",  "operator" => "!=", "value" => "closed"]],
    "delete" => [["field" => "locked",  "operator" => "==", "value" => "0"]],
    "view"   => [["field" => "visible", "operator" => "==", "value" => "1"]],
],
Using render("edit") and render("view") with Nested Tables
When you call render("edit", $id) or render("view", $id),
ArtiGrid renders the edit or view form for a specific record directly in the page —
without showing the main CRUD table. Any nested tables configured on that grid
are pre-rendered inline alongside the form.
$grid = new ArtiGrid();
$grid->table('orders');
$grid->validation_required("customerNumber");

$grid->nestedTable("Order Details", "orderNumber", "orderdetails", "orderNumber", [
    "actions"    => ["add" => true, "edit" => true, "delete" => true, "view" => true],
    "columns"    => ['productCode', 'quantityOrdered', 'priceEach'],
    "formFields" => ['productCode', 'quantityOrdered', 'priceEach'],
    "buttonsArrange" => true,
]);

// Render the edit form for order #10101, with the nested grid pre-loaded
echo $grid->render("edit", 10101);Known limitation — dropdown buttons with multiple nested grids
When using buttonsArrange: true (dropdown action buttons) and
you have two or more nested grids on the same page via
render("edit"), the dropdown toggle may not work correctly.
This happens because each nested grid initializes its own dropdown listener,
and they cancel each other out.
The fix is a one-line change in artigrid.js: replace the
per-instance flag with a global one in clickDropdown().
// artigrid.js — clickDropdown()

// ❌ Before (per-instance flag — breaks with multiple grids on the same page)
// if (this._dropdownBound) return;
// this._dropdownBound = true;

// ✅ After (global flag — only one document listener regardless of instance count)
if (ArtiGrid._globalDropdownBound) return;
ArtiGrid._globalDropdownBound = true;
Full Example
The example below demonstrates a 3-level nested structure: orders → orderdetails → products, plus a second independent child orders → customers.
$grid = new ArtiGrid();
$grid->table('orders');
$grid->template('bootstrap5');
$grid->unset("add", true);
$grid->perPage(5);
$grid->required(false);
$grid->validation_required("customerNumber");

// ── Level 2: orderdetails ─────────────────────────────────────────
$grid->nestedTable("Order Details", "orderNumber", "orderdetails", "orderNumber", [

    // ── Actions ──────────────────────────────────────────────────
    "actions" => [
        "add"             => true,
        "edit"            => true,
        "delete"          => true,
        "view"            => true,
        "search"          => true,
        "refresh"         => true,
        "delete_multiple" => true,
        "edit_multiple"   => true,
    ],

    // ── Layout ───────────────────────────────────────────────────
    "template"       => "bootstrap5",     // bootstrap5 | bootstrap4
    "useModal"       => false,            // open forms inline instead of modal
    "buttonsArrange" => true,             // group action buttons into a dropdown
    "actionsPosition"=> "right",          // left | right

    // ── Pagination ───────────────────────────────────────────────
    "perPage"        => 5,
    "perPageOptions" => [5, 10, 25, 50, "all"],

    // ── Columns & Fields ─────────────────────────────────────────
    "columns"        => ['productCode', 'quantityOrdered', 'priceEach'],
    "formFields"     => ['productCode', 'quantityOrdered', 'priceEach'],
    "hiddenColumns"  => [],               // columns to hide from the grid view
    "colRename"      => [
        'productCode'     => 'Code',
        'quantityOrdered' => 'Qty',
        'priceEach'       => 'Unit Price',
    ],

    // ── Sorting ──────────────────────────────────────────────────
    "sortColumn"     => "priceEach",
    "sortOrder"      => "desc",           // asc | desc

    // ── Field Types ──────────────────────────────────────────────
    "fieldTypes"     => [
        'priceEach' => 'number',          // text, number, date, datetime,
                                          // textarea, checkbox, hidden, etc.
    ],

    // ── Validation ───────────────────────────────────────────────
    "requiredFields"    => ['productCode', 'quantityOrdered', 'priceEach'],
    "allFieldsRequired" => false,

    // ── Comboboxes ───────────────────────────────────────────────
    "comboBoxes" => [
        // From a database table
        'productCode' => [
            'source'      => 'table',
            'table'       => 'products',
            'value'       => 'productCode',
            'label'       => 'productName',
            'dependsOn'   => null,        // parent field name (for dependent dropdowns)
            'dependsField'=> null,        // DB column to match
            'where'       => [],
        ],
        // From a static array
        'status' => [
            'source'  => 'array',
            'options' => ['active' => 'Active', 'inactive' => 'Inactive'],
        ],
    ],

    // ── Radio Buttons ────────────────────────────────────────────
    "radioFields" => [
        'priority' => [
            'low'    => 'Low',
            'medium' => 'Medium',
            'high'   => 'High',
        ],
    ],

    // ── Export ───────────────────────────────────────────────────
    "exportTypes" => ['excel', 'csv', 'pdf'],

    // ── Inline Edit ──────────────────────────────────────────────
    "inlineEditEnabled" => false,
    "inlineEditConfig"  => [
        'mode'       => 'cell',           // cell | row
        'saveOnBlur' => true,
        'highlight'  => true,
    ],

    // ── Form Templates ───────────────────────────────────────────
    "insertFormTemplate" => "",           // custom HTML string or file path
    "editFormTemplate"   => "",
    "viewFormTemplate"   => "",
    "crudTemplate"       => "",           // custom HTML template for the full grid

    // ── Custom Buttons ───────────────────────────────────────────
    "customButtons" => [
        [
            'class'      => 'btn btn-sm btn-info',
            'action'     => 'customAction',
            'label'      => '',
            'title'      => 'Preview',
            'conditions' => ['quantityOrdered', '>', 0],
            'url'        => '/preview/{productCode}',
            'target'     => '_blank',
            'attributes' => ['data-code' => '{productCode}'],
        ],
    ],

    // ── Duplicate Check ──────────────────────────────────────────
    "duplicateFields" => ['productCode'],

    // ── Conditional Cell Colors ──────────────────────────────────
    "columnColors" => [
        [
            'field'    => 'quantityOrdered',
            'operator' => '<',
            'value'    => 10,
            'color'    => 'background:red;color:white;',
        ],
    ],

    // ── Conditional Row Colors ───────────────────────────────────
    "rowColors" => [
        [
            'field'    => 'priceEach',
            'operator' => '>',
            'value'    => 100,
            'color'    => [
                'background'  => '#fff3cd',
                'color'       => '#000',
                'font-weight' => 'bold',
            ],
        ],
    ],

    // ── Action Button Conditions ─────────────────────────────────
    "actionConditions" => [
        "edit"   => [["field" => "productCode", "operator" => "!=", "value" => "S18_2325"]],
        "delete" => [["field" => "quantityOrdered", "operator" => ">", "value" => 0]],
        "view"   => [],
    ],

    // ── Joins ────────────────────────────────────────────────────
    "joins" => [
        [
            'localColumn'   => 'productCode',
            'joinTable'     => 'products',
            'foreignColumn' => 'productCode',
            'type'          => 'LEFT',    // INNER | LEFT | RIGHT
        ],
    ],

    // ── Subselects (dynamic aggregated columns) ──────────────────
    "subselects" => [
        'TotalLine' => 'SELECT SUM(quantityOrdered * priceEach)
                        FROM orderdetails
                        WHERE orderNumber = {orderNumber}',
    ],

    // ── Calculated Fields (arithmetic on existing columns) ───────
    "calculatedFields" => [
        'LineTotal' => '{quantityOrdered} * {priceEach}',
    ],

    // ── Sub-nesting (Level 3) ────────────────────────────────────
    "nestedGrids" => [
        [
            "label"      => "Products",
            "parentKey"  => "productCode",
            "childTable" => "products",
            "childKey"   => "productCode",
            "config"     => [
                "actions" => [
                    "add"             => true,
                    "edit"            => true,
                    "delete"          => false,
                    "view"            => true,
                    "delete_multiple" => true,
                    "edit_multiple"   => true,
                ],
                "columns"    => ['productCode', 'productName', 'productLine', 'quantityInStock'],
                "formFields" => ['productCode', 'productName', 'productLine', 'quantityInStock'],
                "perPage"    => 5,
            ],
        ],
    ],
]);

// ── Level 2: customers (independent second child of orders) ───────
$grid->nestedTable("Customers", "orderNumber", "customers", "orderNumber", [
    "actions" => [
        "add"             => true,
        "edit"            => true,
        "delete"          => false,
        "view"            => true,
        "search"          => true,
        "delete_multiple" => true,
        "edit_multiple"   => true,
    ],
    "columns"    => ['customerName', 'city', 'country'],
    "formFields" => ['customerName', 'city', 'country', 'orderNumber'],
    "perPage"    => 5,
    "template"   => "bootstrap5",
]);

echo $grid->render();- A top-level CRUD grid for
orders - A child grid for
orderdetailswith dropdown buttons and a conditional Edit rule - A grandchild grid for
productsnested insideorderdetails - A second independent child grid for
customersattached to the same parent - All CRUD operations, search, pagination, and bulk actions working at every level
Overview SubSelect & Calculations
ArtiGrid allows you to enrich your grids with dynamic data using subselects and calculated fields. This enables you to pull aggregated values from related tables and perform inline computations directly inside the grid without additional backend processing.
- Dynamic value injection using placeholders like {columnName}
- Execution of subqueries per row
- Automatic mapping of subselect results into grid columns
- Support for arithmetic expressions between fields
- Real-time computed columns without database schema changes
- Combination of multiple subselect + calculated fields
SubSelect Concept
A subselect allows you to retrieve aggregated or related data from another table
based on the current row context. The placeholder {customerNumber} is automatically
replaced for each record.
  $grid->subselect('Paid',
      'SELECT SUM(amount) FROM payments WHERE customerNumber = {customerNumber}'
  );
In this example, ArtiGrid calculates the total payments made by each customer dynamically.
Calculated Fields
Calculated fields allow you to create derived values using existing columns or subselect results. These expressions are evaluated per row after all data is resolved.
$grid->calculate('Profit', '{Paid} - {creditLimit}');
Here, Profit is computed by subtracting the customer's credit limit from the total paid amount.
Full Implementation Example
This is a complete working example combining both features:
  <?php
      $grid = new ArtiGrid();
      $grid->table('customers');

      $grid->crudCol([
          'customerNumber',
          'customerName',
          'city',
          'creditLimit',
          'Paid',
          'Profit'
      ]);

      $grid->subselect('Paid',
          'SELECT SUM(amount) FROM payments WHERE customerNumber = {customerNumber}'
      );

      $grid->calculate('Profit', '{Paid} - {creditLimit}');

      echo $grid->render();
  ?>